Ansible自动化运维指南:涵盖Ansible基本概念、常用模块、Playbook及Docker部署Ansible Tower实践。
原文标题:基于Docker的Ansible自动化运维实现
原文作者:牧羊人的方向
冷月清谈:
Ansible是一个基于Python开发的自动化运维工具,无需在被管节点安装客户端,通过SSH进行通信。其核心组件包括模块(Modules)、插件(Plugins)、主机清单(Inventory)和剧本(Playbooks)。Ansible支持ad-hoc和playbook两种任务执行模式,前者用于执行单条命令,后者用于编排多个任务。
文章详细讲解了Ansible的配置文件、Inventory文件、常用命令和模块,并通过示例演示了ping、command、shell、copy、file、fetch、cron、yum、service、user和group等模块的使用方法。
Playbook是Ansible的核心功能,它使用YAML格式定义一系列任务,并通过handlers机制在任务状态发生变化时执行特定操作。文章给出了一个Playbook示例,演示了如何安装和配置Nginx服务,并讲解了标签和notify的使用。
最后,文章介绍了Ansible Tower的架构和基于Docker的部署方法,包括环境准备、代码下载、依赖安装、配置和编译等步骤。
怜星夜思:
2、Ansible和SaltStack都是流行的自动化运维工具,它们各自有什么优缺点?该如何选择?
3、Ansible Tower 提供了Web UI 和 REST API,那么在实际使用中,如何结合这两种方式来管理自动化任务?
原文内容
本文简要介绍自动化运维工具Ansible基本概念及模块使用,并结合环境部署Ansible和可视化管理平台Ansible Tower。
1、Ansible基本概念
Ansible基本架构如下,包括modules、plugins、inventory、playbooks等模块。

-
Modules:包括core modules和custom modules。core modules是Ansible自带的模块,custom modules是核心模块功能不足时,用户可以添加的扩展模块
-
Plugins: 通过插件来实现数据传输、记录日志、发送邮件、连接inventory等功能
-
Playbooks: 剧本,通常为YAML格式文件,将多个任务定义在一个文件中,定义主机需要调用哪些模块来完成的功能
-
Inventory: 记录由Ansible管理的主机信息,包括端口、密码、ip等
-
Control node:Ansible安装的机器(不能为Windows服务器),可以在任何control node上运行ansible或ansible-playbook命令
-
Manage node:Ansible管理的hosts主机,在managed nodes没有安装Ansible
Ansible系统由控制主机对被管节点的操作方式可分为两类,即ad-hoc和playbook:
-
ad-hoc模式(点对点模式)
Ad-hoc模式支持使用ansible命令对多个manage hosts批量执行单条命令。ad-hoc命令是一种可以快速输入的命令,相当于bash中的一句shell命令。
-
playbook模式(剧本模式)
Playbook是Ansible主要管理方式,通过多个task集合完成一类功能,可以简单地把playbook理解为多条ad-hoc操作的配置文件。

-
加载配置文件,默认/etc/ansible/ansible.cfg
-
查找对应的主机配置文件inventory,找到要执行的主机或者组
-
加载自己对应的模块文件,如command
-
通过ansible将模块或命令生成对应的临时py文件(python脚本), 并将该文件传输至远程服务器
-
对应执行home目录的.ansible/tmp/XXX/XXX.PY文件
-
给文件+x执行权限
-
执行并返回结果
-
删除临时py文件,sleep 0退出


2)如果主机名称遵循相似的命名模式,可以使用列表的方式标识各主机,例如:
[webservers]
www[01:50].example.com
[databases]
db-[a:f].example.com
3)主机变量: 可以在inventory中定义主机时为其添加主机变量以便于在playbook中使用。例如:
[webservers]
www1.com http_port=80 maxRequestsPerChild=808
www2.com http_port=8080 maxRequestsPerChild=909

以下为例:
some_host         ansible_ssh_port=2222     ansible_ssh_user=manager
aws_host          ansible_ssh_private_key_file=/home/example/.ssh/aws.pem
freebsd_host      ansible_python_interpreter=/usr/local/bin/python
ruby_module_host  ansible_ruby_interpreter=/usr/bin/ruby.1.9.3

其中,比较常用的是/usr/bin/ansible和/usr/bin/ansible-playbook
2)ansible命令详解
命令的具体格式如下:
ansible <host-pattern> [-f forks] [-m module_name] [-a args]


1)主机连通性测试
使用ansible node01 -m ping命令来进行主机连通性测试,效果如下:
[root@tango-01 /]# ansible node01 -m ping
192.168.112.101 | SUCCESS => {
    "ansible_facts": {
        "discovered_interpreter_python": "/usr/bin/python"
    },
    "changed": false,
    "ping": "pong"
}
2)command模块
这个模块可以直接在远程主机上执行命令,并将结果返回本主机。
[root@tango-01 /]# ansible node01 -m command -a 'ss -ntl'
192.168.112.101 | CHANGED | rc=0 >>
State      Recv-Q Send-Q Local Address:Port               Peer Address:Port
LISTEN     0      128    192.168.112.101:2380                     *:*
LISTEN     0      128          *:20180                    *:*
LISTEN     0      128          *:22                       *:*
LISTEN     0      100    127.0.0.1:25                       *:*
3)shell模块
shell模块可以在远程主机上调用shell解释器运行命令,支持shell的各种功能,例如管道等。
[root@tango-01 /]# ansible node01 -m shell -a 'cat /etc/passwd |grep "test001"'
192.168.112.101 | CHANGED | rc=0 >>
test001:x:1003:1003::/home/test001:/bin/bash
4)copy模块
这个模块用于将文件复制到远程主机,同时支持给定内容生成文件和修改权限等。
[root@tango-01 tmp]# ansible node01 -m copy -a 'src=/tmp/hello.txt dest=/tmp/'
192.168.112.101 | CHANGED => {
    "ansible_facts": {
        "discovered_interpreter_python": "/usr/bin/python"
    },
    "changed": true,
    "checksum": "22596363b3de40b06f981fb85d82312e8c0ed511",
    "dest": "/tmp/hello.txt",
    "gid": 0,
    "group": "root",
    "md5sum": "6f5902ac237024bdd0c176cb93063dc4",
    "mode": "0644",
    "owner": "root",
    "secontext": "unconfined_u:object_r:admin_home_t:s0",
    "size": 12,
    "src": "/root/.ansible/tmp/ansible-tmp-1605945209.06-2426-102860851170573/source",
    "state": "file",
    "uid": 0
}
5)file模块
该模块主要用于设置文件的属性,比如创建文件、创建链接文件、删除文件等。
[root@tango-01 tmp]# ansible node01 -m file -a 'path=/tmp/ansible state=directory'
192.168.112.101 | CHANGED => {
    "ansible_facts": {
        "discovered_interpreter_python": "/usr/bin/python"
    },
    "changed": true,
    "gid": 0,
    "group": "root",
    "mode": "0755",
    "owner": "root",
    "path": "/tmp/ansible",
    "secontext": "unconfined_u:object_r:user_tmp_t:s0",
    "size": 6,
    "state": "directory",
    "uid": 0
}
6)fetch模块
该模块用于从远程某主机获取(复制)文件到本地。
[root@tango-01 tmp]# ansible node01 -m fetch -a 'src=/tmp/hello-01.txt dest=/tmp'
192.168.112.101 | CHANGED => {
    "changed": true,
    "checksum": "22596363b3de40b06f981fb85d82312e8c0ed511",
    "dest": "/tmp/192.168.112.101/tmp/hello-01.txt",
    "md5sum": "6f5902ac237024bdd0c176cb93063dc4",
    "remote_checksum": "22596363b3de40b06f981fb85d82312e8c0ed511",
    "remote_md5sum": null
}
7)cron模块
该模块适用于管理cron计划任务的。
[root@tango-01 tmp]# ansible node01 -m cron -a 'name="ntp update every 5 min" minute=*/5 job="/sbin/ntpdate 172.17.0.1 &> /dev/null"'
192.168.112.101 | CHANGED => {
    "ansible_facts": {
        "discovered_interpreter_python": "/usr/bin/python"
    },
    "changed": true,
    "envs": [],
    "jobs": [
        "ntp update every 5 min"
    ]
}
在tango-centos01节点可以看到定义的cron计划任务:
[root@tango-centos01 tmp]# cat /etc/passwd | cut -f 1 -d : |xargs -I {} crontab -l -u {}
#Ansible: ntp update every 5 min
*/5 * * * * /sbin/ntpdate 172.17.0.1 &> /dev/null
8)yum模块
该模块主要用于软件的安装。
[root@tango-01 /]# ansible node01 -m yum -a 'name=httpd state=present'
192.168.112.101 | CHANGED => {
    "ansible_facts": {
        "discovered_interpreter_python": "/usr/bin/python"
    },
    "changed": true,
    "changes": {
        "installed": [
            "httpd"
        ]
    },
    "msg": "",
    "rc": 0,
    "results": [
        "Loaded plugins: fastestmirror\nLoading mirror speeds from cached hostfile\n * base: mirrors.cn99.com\n * extras: mirrors.cn99.com\n * updates: mirror.bit.edu.cn\nResolving Dependencies\n--> Running transaction check\n---> Package httpd.x86_64 0:2.4.6-97.el7.centos will be installed\n--> Processing Dependency: httpd-tools = 2.4.6-97.el7.centos for package: httpd-2.4.6-97.el7.centos.x86_64\n--> Processing Dependency: /etc/mime.types for package: httpd-2.4.6-97.el7.centos.x86_64\n--> Processing Dependency: libaprutil-1.so.0()(64bit) for package: httpd-2.4.6-97.el7.centos.x86_64\n--> Processing Dependency: libapr-1.so.0()(64bit) for package: httpd-2.4.6-97.el7.centos.x86_64\n--> Running transaction check\n---> Package apr.x86_64 0:1.4.8-7.el7 will be installed\n---> Package apr-util.x86_64 0:1.5.2-6.el7 will be installed\n---> Package httpd-tools.x86_64 0:2.4.6-97.el7.centos will be installed\n---> Package mailcap.noarch 0:2.1.41-2.el7 will be installed\n--> Finished Dependency Resolution\n\nDependencies Resolved\n\n================================================================================\n Package           Arch         Version                     Repository     Size\n================================================================================\nInstalling:\n httpd             x86_64       2.4.6-97.el7.centos         updates       2.7 M\nInstalling for dependencies:\n apr               x86_64       1.4.8-7.el7                 base          104 k\n apr-util          x86_64       1.5.2-6.el7                 base           92 k\n httpd-tools       x86_64       2.4.6-97.el7.centos         updates        93 k\n mailcap           noarch       2.1.41-2.el7                base           31 k\n\nTransaction Summary\n================================================================================\nInstall  1 Package (+4 Dependent packages)\n\nTotal download size: 3.0 M\nInstalled size: 10 M\nDownloading packages:\n--------------------------------------------------------------------------------\nTotal                                              453 kB/s | 3.0 MB  00:06     \nRunning transaction check\nRunning transaction test\nTransaction test succeeded\nRunning transaction\n  Installing : apr-1.4.8-7.el7.x86_64                                       1/5 \n  Installing : apr-util-1.5.2-6.el7.x86_64                                  2/5 \n  Installing : httpd-tools-2.4.6-97.el7.centos.x86_64                       3/5 \n  Installing : mailcap-2.1.41-2.el7.noarch                                  4/5 \n  Installing : httpd-2.4.6-97.el7.centos.x86_64                             5/5 \n  Verifying  : httpd-2.4.6-97.el7.centos.x86_64                             1/5 \n  Verifying  : apr-1.4.8-7.el7.x86_64                                       2/5 \n  Verifying  : mailcap-2.1.41-2.el7.noarch                                  3/5 \n  Verifying  : httpd-tools-2.4.6-97.el7.centos.x86_64                       4/5 \n  Verifying  : apr-util-1.5.2-6.el7.x86_64                                  5/5 \n\nInstalled:\n  httpd.x86_64 0:2.4.6-97.el7.centos                                            \n\nDependency Installed:\n  apr.x86_64 0:1.4.8-7.el7                     apr-util.x86_64 0:1.5.2-6.el7    \n  httpd-tools.x86_64 0:2.4.6-97.el7.centos     mailcap.noarch 0:2.1.41-2.el7    \n\nComplete!\n"
    ]
}
9)service 模块 该模块用于服务程序的管理。
[root@tango-01 /]# ansible node01 -m service -a 'name=docker state=started enabled=true'
192.168.112.101 | SUCCESS => {
    "ansible_facts": {
        "discovered_interpreter_python": "/usr/bin/python"
    },
    "changed": false,
    "enabled": true,
    "name": "docker",
    "state": "started",
10)user模块
该模块主要是用来管理用户账号。
[root@tango-01 /]# ansible node01 -m user -a "name=test002 password=123"
[WARNING]: The input password appears not to have been hashed. The 'password' argument must be encrypted for this module to work properly.
192.168.112.101 | CHANGED => {
    "ansible_facts": {
        "discovered_interpreter_python": "/usr/bin/python"
    },
    "changed": true,
    "comment": "",
    "create_home": true,
    "group": 1004,
    "home": "/home/test002",
    "name": "test002",
    "password": "NOT_LOGGING_PASSWORD",
    "shell": "/bin/bash",
    "state": "present",
    "system": false,
    "uid": 1004
}
11)group模块
该模块主要用于添加或删除组。
[root@tango-01 /]# ansible node01 -m group -a 'name=test02 gid=1100'
192.168.112.101 | CHANGED => {
    "ansible_facts": {
        "discovered_interpreter_python": "/usr/bin/python"
    },
    "changed": true,
    "gid": 1100,
    "name": "test02",
    "state": "present",
    "system": false
}
12)setup模块
该模块主要用于收集信息,是通过调用facts组件来实现的。
[root@tango-01 tmp]# ansible node01 -m setup -a 'filter="*mem*"'
192.168.112.101 | SUCCESS => {
    "ansible_facts": {
        "ansible_memfree_mb": 60,
        "ansible_memory_mb": {
            "nocache": {
                "free": 196,
                "used": 780
            },
            "real": {
                "free": 60,
                "total": 976,
                "used": 916
            },
            "swap": {
                "cached": 17,
                "free": 1962,
                "total": 2047,
                "used": 85
            }
        },
        "ansible_memtotal_mb": 976,
        "discovered_interpreter_python": "/usr/bin/python"
    },
    "changed": false
}
Playbook是ansible用于配置、部署和管理被控节点的剧本,通过playbook的详细描述,执行其中的一系列tasks ,可以让远端主机达到预期的状态。playbook就像ansible控制器给被控节点列出的的一系列 tibo-do-list ,而被控节点必须要完成。
-
文件的第一行应该以 "---" (三个连字符)开始,表明YMAL文件的开始。
-
在同一行中,#之后的内容表示注释,类似于shell,python和ruby。
-
YMAL中的列表元素以”-”开头然后紧跟着一个空格,后面为元素内容。
-
同一个列表中的元素应该保持相同的缩进。否则会被当做错误处理。
-
play中hosts,variables,roles,tasks等对象的表示方法都是键值中间以":"分隔表示,":"后面还要增加一个空格。
以下是一个playbook仅包含一个play:
---
- hosts: webservers
  vars:
    http_port: 80
    max_clients: 200
  remote_user: root
  tasks:
  - name: ensure apache is at the latest version
    yum: pkg=httpd state=latest
  - name: write the apache config file
    template: src=/srv/httpd.j2 dest=/etc/httpd.conf
    notify:
    - restart apache
  - name: ensure apache is running
    service: name=httpd state=started
  handlers:
    - name: restart apache
      service: name=httpd state=restarted
-
Hosts主机:使用hosts指示使用哪个主机或主机组来运行下面的tasks,每个playbook都必须指定hosts
-
remote_user:指定远端主机中的哪个用户来登录远端系统,在远端系统执行task的用户,可以任意指定,也可以使用sudo,但是用户必须要有执行相应task的权限
-
tasks:指定远端主机将要执行的一系列动作,tasks的核心为ansible的模块,tasks包含name和要执行的模块。一个task在其所对应的所有主机上(通过 host pattern 匹配的所有主机)执行完毕之后,下一个task才会执行。如果一个host执行task失败,这个host将会从整个playbook的rotation中移除。
-
Handlers:在发生改变时执行的操作,‘notify’下列出的即是handlers。’notify’ actions会在playbook的每一个task结束时被触发,而且即使有多个不同的task通知改动的发生,‘notify’ actions 只会被触发一次
[root@tango-01 ansible]# vim nginx.yml
---
- hosts: node01
  remote_user: root
  tasks:
    - name: install nginx
      yum: name=nginx state=present
    - name: copy nginx.conf
      copy: src=/usr/local/docker/app/ansible/nginx.conf dest=/etc/nginx/nginx.conf backup=yes
      notify: reload
      tags: reloadnginx
    - name: start nginx service
      service: name=nginx state=started
      tags: startnginx
  handlers:
    - name: reload
      service: name=nginx state=restarted
-
notify: reload#当nginx.conf发生改变时,通知给相应的handlers
-
tags: reloadnginx#打标签
2)测试运行结果
[root@tango-01 ansible]# ansible-playbook nginx.yml

PLAY [node01] *************************************************************************************************************************************************************

TASK [Gathering Facts] ****************************************************************************************************************************************************
ok: [192.168.112.101]

TASK [install nginx] ******************************************************************************************************************************************************
ok: [192.168.112.101]

TASK [copy nginx.conf] ****************************************************************************************************************************************************
changed: [192.168.112.101]

TASK [start nginx service] ************************************************************************************************************************************************
changed: [192.168.112.101]

RUNNING HANDLER [reload] **************************************************************************************************************************************************
changed: [192.168.112.101]

PLAY RECAP ****************************************************************************************************************************************************************
192.168.112.101            : ok=5    changed=3    unreachable=0    failed=0    skipped=0    rescued=0    ignored=0

[root@tango-01 ansible]#
使用ansible-playbook运行playbook文件,得到如下输出信息,输出内容为JSON格式。执行有三个步骤:1、收集facts;2、执行tasks ;3、报告结果

现在可以看看192.168.112.101机器的端口是否开启:
[root@tango-01 ansible]# ansible node01 -m shell -a 'ss -nutlp |grep nginx'
192.168.112.101 | CHANGED | rc=0 >>
tcp    LISTEN     0      128       *:80                    *:*                   users:(("nginx",pid=3755,fd=6),("nginx",pid=3754,fd=6))
3)测试标签
我们在里面已经打上了一个标签,所以可以直接引用标签。但是需要先把服务关闭,再来运行剧本并引用标签:
[root@tango-01 ansible]# ansible node01 -m shell -a 'systemctl stop nginx'
192.168.112.101 | CHANGED | rc=0 >>

[root@tango-01 ansible]# ansible-playbook nginx.yml -t startnginx

PLAY [node01] *************************************************************************************************************************************************************

TASK [Gathering Facts] ****************************************************************************************************************************************************
ok: [192.168.112.101]

TASK [start nginx service] ************************************************************************************************************************************************
changed: [192.168.112.101]

PLAY RECAP ****************************************************************************************************************************************************************
192.168.112.101            : ok=2    changed=1    unreachable=0    failed=0    skipped=0    rescued=0    ignored=0
4)测试notify
notify的触发条件是配置文件被改变,把配置文件中的端口改一下:
[root@tango-01 ansible]# vi nginx.conf
        listen       8080;
然后重新加载一下这个剧本,执行的就是reload段以及我们定义的notify部分:
[root@tango-01 ansible]# ansible-playbook nginx.yml -t reloadnginx

PLAY [node01] *************************************************************************************************************************************************************

TASK [Gathering Facts] ****************************************************************************************************************************************************
ok: [192.168.112.101]

TASK [copy nginx.conf] ****************************************************************************************************************************************************
changed: [192.168.112.101]

RUNNING HANDLER [reload] **************************************************************************************************************************************************
changed: [192.168.112.101]

PLAY RECAP ****************************************************************************************************************************************************************
192.168.112.101            : ok=3    changed=2    unreachable=0    failed=0    skipped=0    rescued=0    ignored=0
再来看一看nginx端口号:
[root@tango-01 ansible]# ansible node01 -m shell -a 'ss -ntlp | grep nginx'
192.168.112.101 | CHANGED | rc=0 >>
LISTEN     0      128          *:8080                     *:*                   users:(("nginx",pid=4273,fd=6),("nginx",pid=4272,fd=6))
可以看出,nginx端口已经变成了8080。
2、Ansible部署使用
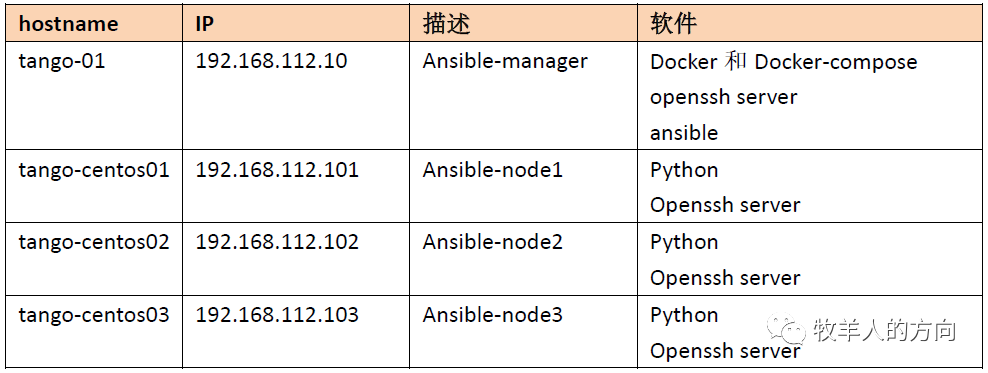
2)服务器间基于ssh密钥方式建立远程连接
-
安装openssh-server
[root@tango-01 /]# yum install openssh-server -y
[root@tango-centos01 /]# yum install openssh-server
[root@tango-centos02 /]# yum install openssh-server
[root@tango-centos03 /]# yum install openssh-server
-
在tango-01生成密钥
[root@tango-01 /]# ssh-keygen -t dsa -f /root/.ssh/id_dsa -N ""
Generating public/private dsa key pair.
Your identification has been saved in /root/.ssh/id_dsa.
Your public key has been saved in /root/.ssh/id_dsa.pub.
The key fingerprint is:
SHA256:b+893eSvCD5PGT9J+36+EHVcJhumQgHKn13tVNlry0Y root@tango-01
The key's randomart image is:
+---[DSA 1024]----+
|        ..o.  + *|
|     . . .   + Oo|
|      o   . o +.+|
|       . o o o.E.|
|        S . ..* .|
|         .   =.*.|
|          + o.*+.|
|         o.+ ooo=|
|          .+= o*O|
+----[SHA256]-----+
-
将密钥分发到目标主机
[root@tango-01 /]# ssh-copy-id -i root@192.168.112.101
[root@tango-01 /]# ssh-copy-id -i root@192.168.112.102
[root@tango-01 /]# ssh-copy-id -i root@192.168.112.103
-
SSH登录目标主机验证
[root@tango-01 /]# ssh 192.168.112.101
[root@tango-01 /]# ssh 192.168.112.102
[root@tango-01 /]# ssh 192.168.112.103
1)在tango-01安装epel源
[root@tango-01 /]# yum install epel-release -y
2)查看epel源并安装ansible
[root@tango-01 /]# ll /etc/yum.repos.d/epel*
-rw-r--r-- 1 root root  951 Oct  3  2017 /etc/yum.repos.d/epel.repo
-rw-r--r-- 1 root root 1050 Oct  3  2017 /etc/yum.repos.d/epel-testing.repo
[root@tango-01 /]# yum install -y ansible
3)查看Ansible版本
[root@tango-01 /]# ansible --version
ansible 2.9.15
  config file = /etc/ansible/ansible.cfg
  configured module search path = [u'/root/.ansible/plugins/modules', u'/usr/share/ansible/plugins/modules']
  ansible python module location = /usr/lib/python2.7/site-packages/ansible
  executable location = /bin/ansible
  python version = 2.7.5 (default, Apr  2 2020, 13:16:51) [GCC 4.8.5 20150623 (Red Hat 4.8.5-39)]
4)修改配置文件,添加主机组:
[root@tango-01 /]# vi /etc/ansible/hosts
[node01]
192.168.112.101
192.168.112.102
192.168.112.103
5)使用ping命令测试连通性
[root@tango-01 /]# ansible node01 -m ping
192.168.112.102 | SUCCESS => {
    "ansible_facts": {
        "discovered_interpreter_python": "/usr/bin/python"
    },
    "changed": false,
    "ping": "pong"
}
192.168.112.101 | SUCCESS => {
    "ansible_facts": {
        "discovered_interpreter_python": "/usr/bin/python"
    },
    "changed": false,
    "ping": "pong"
}
192.168.112.103 | SUCCESS => {
    "ansible_facts": {
        "discovered_interpreter_python": "/usr/bin/python"
    },
    "changed": false,
    "ping": "pong"
}
1)检查节点的内核版本
[root@tango-01 /]# ansible node01 -m command -a "uname -r"
192.168.112.103 | CHANGED | rc=0 >>
3.10.0-693.el7.x86_64
192.168.112.101 | CHANGED | rc=0 >>
3.10.0-693.el7.x86_64
192.168.112.102 | CHANGED | rc=0 >>
3.10.0-693.el7.x86_64
2)给节点增加用户
[root@tango-01 /]# ansible node01 -m user -a "name=test001 password=123"
[WARNING]: The input password appears not to have been hashed. The 'password' argument must be encrypted for this module to work properly.
192.168.112.102 | CHANGED => {
    "ansible_facts": {
        "discovered_interpreter_python": "/usr/bin/python"
    },
    "changed": true,
    "comment": "",
    "create_home": true,
    "group": 1003,
    "home": "/home/test001",
    "name": "test001",
    "password": "NOT_LOGGING_PASSWORD",
    "shell": "/bin/bash",
    "state": "present",
    "system": false,
    "uid": 1003
}
192.168.112.101 | CHANGED => {
    "ansible_facts": {
        "discovered_interpreter_python": "/usr/bin/python"
    },
    "changed": true,
    "comment": "",
    "create_home": true,
    "group": 1003,
    "home": "/home/test001",
    "name": "test001",
    "password": "NOT_LOGGING_PASSWORD",
    "shell": "/bin/bash",
    "state": "present",
    "system": false,
    "uid": 1003
}
192.168.112.103 | CHANGED => {
    "ansible_facts": {
        "discovered_interpreter_python": "/usr/bin/python"
    },
    "changed": true,
    "comment": "",
    "create_home": true,
    "group": 1003,
    "home": "/home/test001",
    "name": "test001",
    "password": "NOT_LOGGING_PASSWORD",
    "shell": "/bin/bash",
    "state": "present",
    "system": false,
    "uid": 1003
}
3、基于Docker部署Ansible-Tower

1)下载awx代码
[root@tango-01 tmp]# git clone https://github.com/ansible/awx.git
[root@tango-01 tmp]# cd awx
[root@tango-01 awx]# git clone https://github.com/ansible/awx-logos.git
2)安装相关依赖包
[root@tango-01 installer]# pip3 install docker
[root@tango-01 installer]# pip3 install docker-compose
否则会提示错误信息:
TASK [local_docker : Start the containers] ********************************************************************************************************************************
fatal: [localhost]: FAILED! => {"changed": false, "msg": "Failed to import the required Python library (Docker SDK for Python: docker (Python >= 2.7) or docker-py (Python 2.6)) on tango-01's Python /usr/local/bin/python3. Please read module documentation and install in the appropriate location. If the required library is installed, but Ansible is using the wrong Python interpreter, please consult the documentation on ansible_python_interpreter, for example via `pip install docker` or `pip install docker-py` (Python 2.6). The error was: No module named 'docker'"}
3)配置inventory
[root@tango-01 installer]# pwd
/tmp/awx/installer
[root@tango-01 installer]# vi inventory
localhost ansible_connection=local ansible_python_interpreter="/usr/bin/env python3"

[all:vars]
dockerhub_base=ansible
dockerhub_version=latest

awx_task_hostname=awx
awx_web_hostname=awxweb
postgres_data_dir="/tmp/pgdocker"
host_port=80
host_port_ssl=443

docker_compose_dir="/var/lib/awx"

pg_username=awx
pg_password=password
pg_database=awx
pg_port=5432

admin_user=admin
admin_password=password

project_data_dir=/var/lib/awx/projects
4)docker编译awx
[root@tango-01 installer]# ansible-playbook -i inventory install.yml
PLAY RECAP ****************************************************************************************************************************************************************
localhost                  : ok=15   changed=4    unreachable=0    failed=0    skipped=91   rescued=0    ignored=0
5)查看结果
[root@tango-01 installer]# docker container ls
CONTAINER ID        IMAGE                COMMAND                  CREATED             STATUS              PORTS                  NAMES
7a1329f43d63        ansible/awx:latest   "/usr/bin/tini -- /u…"   4 minutes ago       Up 3 minutes        8052/tcp               awx_task
056943a3889b        ansible/awx:latest   "/usr/bin/tini -- /b…"   4 minutes ago       Up 3 minutes        0.0.0.0:80->8052/tcp   awx_web
6bf445df5762        postgres:10          "docker-entrypoint.s…"   4 minutes ago       Up 3 minutes        5432/tcp               awx_postgres
d66b2caabfc0        redis                "docker-entrypoint.s…"   4 minutes ago       Up 3 minutes        6379/tcp               awx_redis


参考资料
-
https://docs.ansible.com/ansible/latest/user_guide
-
http://www.ansible.com.cn/
-
https://www.cnblogs.com/keerya/p/7987886.html
-
https://www.cnblogs.com/liuyansheng/p/6093139.html
-
https://blog.csdn.net/len9596/article/details/82656902
-
https://docs.ansible.com/ansible-tower/3.2.4/html/administration/clustering.html