原文标题:从零开始,用英伟达T4、A10训练小型文生视频模型,几小时搞定
原文作者:机器之心
冷月清谈:
怜星夜思:
2、最后的 AI 视频里,圆圈并没有按照提示完全执行命令,这是为什么?
原文内容
选自 levelup.gitconnected
很翔实的一篇教程。
-
OOP:https://www.youtube.com/watch?v=q2SGW2VgwAM
-
神经网络理论:https://www.youtube.com/watch?v=Jy4wM2X21u0
-
GAN 架构:https://www.youtube.com/watch?v=TpMIssRdhco
-
Python 基础:https://www.youtube.com/watch?v=eWRfhZUzrAc
-
生成图像:GAN 根据文本 prompt 创建逼真的图像或修改现有图像,例如增强分辨率或为黑白照片添加颜色。
-
数据增强:GAN 生成合成数据来训练其他机器学习模型,例如为欺诈检测系统创建欺诈交易数据。
-
补充缺失信息:GAN 可以填充缺失数据,例如根据地形图生成地下图像以用于能源应用。
-
生成 3D 模型:GAN 将 2D 图像转换为 3D 模型,在医疗保健等领域非常有用,可用于为手术规划创建逼真的器官图像。

# Operating System module for interacting with the operating system import osModule for generating random numbers
import random
Module for numerical operations
import numpy as np
OpenCV library for image processing
import cv2
Python Imaging Library for image processing
from PIL import Image, ImageDraw, ImageFont
PyTorch library for deep learning
import torch
Dataset class for creating custom datasets in PyTorch
from torch.utils.data import Dataset
Module for image transformations
import torchvision.transforms as transforms
Neural network module in PyTorch
import torch.nn as nn
Optimization algorithms in PyTorch
import torch.optim as optim
Function for padding sequences in PyTorch
from torch.nn.utils.rnn import pad_sequence
Function for saving images in PyTorch
from torchvision.utils import save_image
Module for plotting graphs and images
import matplotlib.pyplot as plt
Module for displaying rich content in IPython environments
from IPython.display import clear_output, display, HTML
Module for encoding and decoding binary data to text
import base64
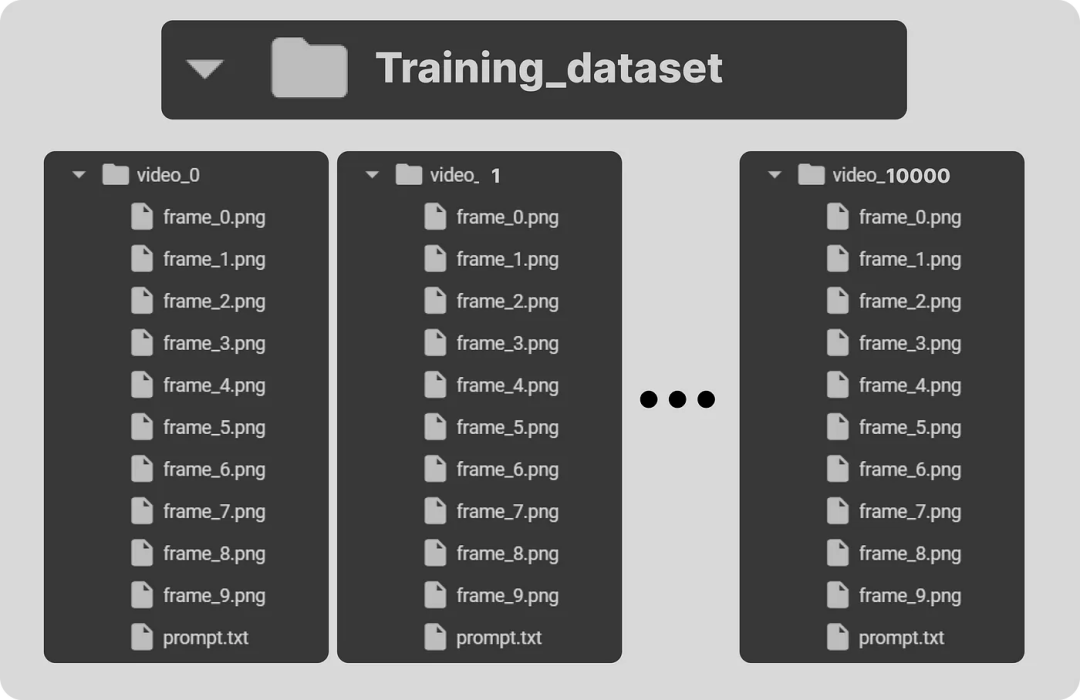
# Create a directory named 'training_dataset' os.makedirs('training_dataset', exist_ok=True)Define the number of videos to generate for the dataset
num_videos = 10000
Define the number of frames per video (1 Second Video)
frames_per_video = 10
Define the size of each image in the dataset
img_size = (64, 64)
Define the size of the shapes (Circle)
shape_size = 10
# Define text prompts and corresponding movements for circles
prompts_and_movements = [
("circle moving down", "circle", "down"), # Move circle downward
("circle moving left", "circle", "left"), # Move circle leftward
("circle moving right", "circle", "right"), # Move circle rightward
("circle moving diagonally up-right", "circle", "diagonal_up_right"), # Move circle diagonally up-right
("circle moving diagonally down-left", "circle", "diagonal_down_left"), # Move circle diagonally down-left
("circle moving diagonally up-left", "circle", "diagonal_up_left"), # Move circle diagonally up-left
("circle moving diagonally down-right", "circle", "diagonal_down_right"), # Move circle diagonally down-right
("circle rotating clockwise", "circle", "rotate_clockwise"), # Rotate circle clockwise
("circle rotating counter-clockwise", "circle", "rotate_counter_clockwise"), # Rotate circle counter-clockwise
("circle shrinking", "circle", "shrink"), # Shrink circle
("circle expanding", "circle", "expand"), # Expand circle
("circle bouncing vertically", "circle", "bounce_vertical"), # Bounce circle vertically
("circle bouncing horizontally", "circle", "bounce_horizontal"), # Bounce circle horizontally
("circle zigzagging vertically", "circle", "zigzag_vertical"), # Zigzag circle vertically
("circle zigzagging horizontally", "circle", "zigzag_horizontal"), # Zigzag circle horizontally
("circle moving up-left", "circle", "up_left"), # Move circle up-left
("circle moving down-right", "circle", "down_right"), # Move circle down-right
("circle moving down-left", "circle", "down_left"), # Move circle down-left
]
# Define function with parameters def create_image_with_moving_shape(size, frame_num, shape, direction):Create a new RGB image with specified size and white background
img = Image.new(‘RGB’, size, color=(255, 255, 255))
Create a drawing context for the image
draw = ImageDraw.Draw(img)
Calculate the center coordinates of the image
center_x, center_y = size[0] // 2, size[1] // 2
Initialize position with center for all movements
position = (center_x, center_y)
Define a dictionary mapping directions to their respective position adjustments or image transformations
direction_map = {
Adjust position downwards based on frame number
“down”: (0, frame_num * 5 % size[1]),
Adjust position to the left based on frame number
“left”: (-frame_num * 5 % size[0], 0),
Adjust position to the right based on frame number
“right”: (frame_num * 5 % size[0], 0),
Adjust position diagonally up and to the right
“diagonal_up_right”: (frame_num * 5 % size[0], -frame_num * 5 % size[1]),
Adjust position diagonally down and to the left
“diagonal_down_left”: (-frame_num * 5 % size[0], frame_num * 5 % size[1]),
Adjust position diagonally up and to the left
“diagonal_up_left”: (-frame_num * 5 % size[0], -frame_num * 5 % size[1]),
Adjust position diagonally down and to the right
“diagonal_down_right”: (frame_num * 5 % size[0], frame_num * 5 % size[1]),
Rotate the image clockwise based on frame number
“rotate_clockwise”: img.rotate(frame_num * 10 % 360, center=(center_x, center_y), fillcolor=(255, 255, 255)),
Rotate the image counter-clockwise based on frame number
“rotate_counter_clockwise”: img.rotate(-frame_num * 10 % 360, center=(center_x, center_y), fillcolor=(255, 255, 255)),
Adjust position for a bouncing effect vertically
“bounce_vertical”: (0, center_y - abs(frame_num * 5 % size[1] - center_y)),
Adjust position for a bouncing effect horizontally
“bounce_horizontal”: (center_x - abs(frame_num * 5 % size[0] - center_x), 0),
Adjust position for a zigzag effect vertically
“zigzag_vertical”: (0, center_y - frame_num * 5 % size[1]) if frame_num % 2 == 0 else (0, center_y + frame_num * 5 % size[1]),
Adjust position for a zigzag effect horizontally
“zigzag_horizontal”: (center_x - frame_num * 5 % size[0], center_y) if frame_num % 2 == 0 else (center_x + frame_num * 5 % size[0], center_y),
Adjust position upwards and to the right based on frame number
“up_right”: (frame_num * 5 % size[0], -frame_num * 5 % size[1]),
Adjust position upwards and to the left based on frame number
“up_left”: (-frame_num * 5 % size[0], -frame_num * 5 % size[1]),
Adjust position downwards and to the right based on frame number
“down_right”: (frame_num * 5 % size[0], frame_num * 5 % size[1]),
Adjust position downwards and to the left based on frame number
“down_left”: (-frame_num * 5 % size[0], frame_num * 5 % size[1])
}Check if direction is in the direction map
if direction in direction_map:
Check if the direction maps to a position adjustment
if isinstance(direction_map[direction], tuple):
Update position based on the adjustment
position = tuple(np.add(position, direction_map[direction]))
else: # If the direction maps to an image transformationUpdate the image based on the transformation
img = direction_map[direction]
Return the image as a numpy array
return np.array(img)
# Iterate over the number of videos to generate for i in range(num_videos): # Randomly choose a prompt and movement from the predefined list prompt, shape, direction = random.choice(prompts_and_movements)Create a directory for the current video
video_dir = f’training_dataset/video_{i}’
os.makedirs(video_dir, exist_ok=True)Write the chosen prompt to a text file in the video directory
with open(f’{video_dir}/prompt.txt’, ‘w’) as f:
f.write(prompt)Generate frames for the current video
for frame_num in range(frames_per_video):
Create an image with a moving shape based on the current frame number, shape, and direction
img = create_image_with_moving_shape(img_size, frame_num, shape, direction)
Save the generated image as a PNG file in the video directory
cv2.imwrite(f’{video_dir}/frame_{frame_num}.png’, img)
# Define a dataset class inheriting from torch.utils.data.Dataset class TextToVideoDataset(Dataset): def __init__(self, root_dir, transform=None): # Initialize the dataset with root directory and optional transform self.root_dir = root_dir self.transform = transform # List all subdirectories in the root directory self.video_dirs = [os.path.join(root_dir, d) for d in os.listdir(root_dir) if os.path.isdir(os.path.join(root_dir, d))] # Initialize lists to store frame paths and corresponding prompts self.frame_paths = [] self.prompts = []Loop through each video directory
for video_dir in self.video_dirs:
List all PNG files in the video directory and store their paths
frames = [os.path.join(video_dir, f) for f in os.listdir(video_dir) if f.endswith(‘.png’)]
self.frame_paths.extend(frames)Read the prompt text file in the video directory and store its content
with open(os.path.join(video_dir, ‘prompt.txt’), ‘r’) as f:
prompt = f.read().strip()Repeat the prompt for each frame in the video and store in prompts list
self.prompts.extend([prompt] * len(frames))
Return the total number of samples in the dataset
def len(self):
return len(self.frame_paths)Retrieve a sample from the dataset given an index
def getitem(self, idx):
Get the path of the frame corresponding to the given index
frame_path = self.frame_paths[idx]
Open the image using PIL (Python Imaging Library)
image = Image.open(frame_path)
Get the prompt corresponding to the given index
prompt = self.prompts[idx]
Apply transformation if specified
if self.transform:
image = self.transform(image)Return the transformed image and the prompt
return image, prompt
# Define a class for text embedding class TextEmbedding(nn.Module): # Constructor method with vocab_size and embed_size parameters def __init__(self, vocab_size, embed_size): # Call the superclass constructor super(TextEmbedding, self).__init__() # Initialize embedding layer self.embedding = nn.Embedding(vocab_size, embed_size)Define the forward pass method
def forward(self, x):
Return embedded representation of input
return self.embedding(x)
class Generator(nn.Module): def __init__(self, text_embed_size): super(Generator, self).__init__()Fully connected layer that takes noise and text embedding as input
self.fc1 = nn.Linear(100 + text_embed_size, 256 * 8 * 8)
Transposed convolutional layers to upsample the input
self.deconv1 = nn.ConvTranspose2d(256, 128, 4, 2, 1)
self.deconv2 = nn.ConvTranspose2d(128, 64, 4, 2, 1)
self.deconv3 = nn.ConvTranspose2d(64, 3, 4, 2, 1) # Output has 3 channels for RGB imagesActivation functions
self.relu = nn.ReLU(True) # ReLU activation function
self.tanh = nn.Tanh() # Tanh activation function for final outputdef forward(self, noise, text_embed):
Concatenate noise and text embedding along the channel dimension
x = torch.cat((noise, text_embed), dim=1)
Fully connected layer followed by reshaping to 4D tensor
x = self.fc1(x).view(-1, 256, 8, 8)
Upsampling through transposed convolution layers with ReLU activation
x = self.relu(self.deconv1(x))
x = self.relu(self.deconv2(x))Final layer with Tanh activation to ensure output values are between -1 and 1 (for images)
x = self.tanh(self.deconv3(x))
return x
class Discriminator(nn.Module): def __init__(self): super(Discriminator, self).__init__()Convolutional layers to process input images
self.conv1 = nn.Conv2d(3, 64, 4, 2, 1) # 3 input channels (RGB), 64 output channels, kernel size 4x4, stride 2, padding 1
self.conv2 = nn.Conv2d(64, 128, 4, 2, 1) # 64 input channels, 128 output channels, kernel size 4x4, stride 2, padding 1
self.conv3 = nn.Conv2d(128, 256, 4, 2, 1) # 128 input channels, 256 output channels, kernel size 4x4, stride 2, padding 1Fully connected layer for classification
self.fc1 = nn.Linear(256 * 8 * 8, 1) # Input size 256x8x8 (output size of last convolution), output size 1 (binary classification)
Activation functions
self.leaky_relu = nn.LeakyReLU(0.2, inplace=True) # Leaky ReLU activation with negative slope 0.2
self.sigmoid = nn.Sigmoid() # Sigmoid activation for final output (probability)def forward(self, input):
Pass input through convolutional layers with LeakyReLU activation
x = self.leaky_relu(self.conv1(input))
x = self.leaky_relu(self.conv2(x))
x = self.leaky_relu(self.conv3(x))Flatten the output of convolutional layers
x = x.view(-1, 256 * 8 * 8)
Pass through fully connected layer with Sigmoid activation for binary classification
x = self.sigmoid(self.fc1(x))
return x
# Check for GPU device = torch.device("cuda" if torch.cuda.is_available() else "cpu")Create a simple vocabulary for text prompts
all_prompts = [prompt for prompt, _, _ in prompts_and_movements] # Extract all prompts from prompts_and_movements list
vocab = {word: idx for idx, word in enumerate(set(" ".join(all_prompts).split()))} # Create a vocabulary dictionary where each unique word is assigned an index
vocab_size = len(vocab) # Size of the vocabulary
embed_size = 10 # Size of the text embedding vectordef encode_text(prompt):
Encode a given prompt into a tensor of indices using the vocabulary
return torch.tensor([vocab[word] for word in prompt.split()])
Initialize models, loss function, and optimizers
text_embedding = TextEmbedding(vocab_size, embed_size).to(device) # Initialize TextEmbedding model with vocab_size and embed_size
netG = Generator(embed_size).to(device) # Initialize Generator model with embed_size
netD = Discriminator().to(device) # Initialize Discriminator model
criterion = nn.BCELoss().to(device) # Binary Cross Entropy loss function
optimizerD = optim.Adam(netD.parameters(), lr=0.0002, betas=(0.5, 0.999)) # Adam optimizer for Discriminator
optimizerG = optim.Adam(netG.parameters(), lr=0.0002, betas=(0.5, 0.999)) # Adam optimizer for Generator
# Number of epochs num_epochs = 13Iterate over each epoch
for epoch in range(num_epochs):
Iterate over each batch of data
for i, (data, prompts) in enumerate(dataloader):
Move real data to device
real_data = data.to(device)
Convert prompts to list
prompts = [prompt for prompt in prompts]
Update Discriminator
netD.zero_grad() # Zero the gradients of the Discriminator
batch_size = real_data.size(0) # Get the batch size
labels = torch.ones(batch_size, 1).to(device) # Create labels for real data (ones)
output = netD(real_data) # Forward pass real data through Discriminator
lossD_real = criterion(output, labels) # Calculate loss on real data
lossD_real.backward() # Backward pass to calculate gradientsGenerate fake data
noise = torch.randn(batch_size, 100).to(device) # Generate random noise
text_embeds = torch.stack([text_embedding(encode_text(prompt).to(device)).mean(dim=0) for prompt in prompts]) # Encode prompts into text embeddings
fake_data = netG(noise, text_embeds) # Generate fake data from noise and text embeddings
labels = torch.zeros(batch_size, 1).to(device) # Create labels for fake data (zeros)
output = netD(fake_data.detach()) # Forward pass fake data through Discriminator (detach to avoid gradients flowing back to Generator)
lossD_fake = criterion(output, labels) # Calculate loss on fake data
lossD_fake.backward() # Backward pass to calculate gradients
optimizerD.step() # Update Discriminator parametersUpdate Generator
netG.zero_grad() # Zero the gradients of the Generator
labels = torch.ones(batch_size, 1).to(device) # Create labels for fake data (ones) to fool Discriminator
output = netD(fake_data) # Forward pass fake data (now updated) through Discriminator
lossG = criterion(output, labels) # Calculate loss for Generator based on Discriminator’s response
lossG.backward() # Backward pass to calculate gradients
optimizerG.step() # Update Generator parametersPrint epoch information
print(f"Epoch [{epoch + 1}/{num_epochs}] Loss D: {lossD_real + lossD_fake}, Loss G: {lossG}")
## OUTPUT ##Epoch [1/13] Loss D: 0.8798642754554749, Loss G: 1.300612449645996
Epoch [2/13] Loss D: 0.8235711455345154, Loss G: 1.3729925155639648
Epoch [3/13] Loss D: 0.6098687052726746, Loss G: 1.3266581296920776
…
# Save the Generator model's state dictionary to a file named 'generator.pth' torch.save(netG.state_dict(), 'generator.pth')Save the Discriminator model’s state dictionary to a file named ‘discriminator.pth’
torch.save(netD.state_dict(), ‘discriminator.pth’)
# Inference function to generate a video based on a given text promptdef generate_video(text_prompt, num_frames=10): # Create a directory for the generated video frames based on the text prompt os.makedirs(f'generated_video_{text_prompt.replace(" ", "_")}', exist_ok=True) # Encode the text prompt into a text embedding tensor text_embed = text_embedding(encode_text(text_prompt).to(device)).mean(dim=0).unsqueeze(0) # Generate frames for the video for frame_num in range(num_frames): # Generate random noise noise = torch.randn(1, 100).to(device) # Generate a fake frame using the Generator network with torch.no_grad(): fake_frame = netG(noise, text_embed) # Save the generated fake frame as an image file save_image(fake_frame, f'generated_video_{text_prompt.replace(" ", "_")}/frame_{frame_num}.png')# usage of the generate_video function with a specific text promptgenerate_video('circle moving up-right')
# Define the path to your folder containing the PNG frames folder_path = 'generated_video_circle_moving_up-right'Get the list of all PNG files in the folder
image_files = [f for f in os.listdir(folder_path) if f.endswith(‘.png’)]
Sort the images by name (assuming they are numbered sequentially)
image_files.sort()
Create a list to store the frames
frames =
Read each image and append it to the frames list
for image_file in image_files:
image_path = os.path.join(folder_path, image_file)
frame = cv2.imread(image_path)
frames.append(frame)Convert the frames list to a numpy array for easier processing
frames = np.array(frames)
Define the frame rate (frames per second)
fps = 10
Create a video writer object
fourcc = cv2.VideoWriter_fourcc(*‘XVID’)
out = cv2.VideoWriter(‘generated_video.avi’, fourcc, fps, (frames[0].shape[1], frames[0].shape[0]))Write each frame to the video
for frame in frames:
out.write(frame)Release the video writer
out.release()